30 May 2013

One Batt, Two Art Yarns -- And Washing a Fleece

There was still lots of blue fleece left from my recent art yarn post and I remained possessed by a yearning to do more blue-themed yarn before moving on to another colour.


I was about to embark on a batt-a-thon when I was interrupted by a gloriously sunny day, one that demanded to be taken advantage of through the drying of a newly-washed fleece.  Being only an in-between-time fibre artist -- having work, children, husband, household affairs, friends, family, and a recent fabric sale that led to extravagant purchases on my part accompanied by lavish promises of summer fashions for my daughter -- I have to grab my fleece-drying days as I can.  If it means putting off other fibre-related fun, alas, so it must be.   And don't get me wrong; I love washing fleece.  I love transforming the richly-scented bags of wonderful that the perplexed postal carrier lugs up to my door into ready-to-use ooh-la-la. As it is shearing time, and as I have a few newly purchased raw fleeces I can't wait to dig into, it was easy to comply. 

The chosen one was a beautiful 6.5-lb Corriedale from Rupperts.  


No VM in this lovely covered fleece with amazing staple length.  Some of the raw wool almost
looked clean already, like maybe this was an indoor sheep or something.  
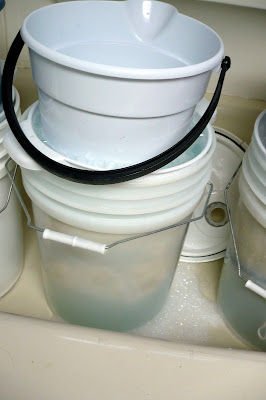
There are so many excellent online instructions on how to wash raw fleece, I won't go into my whole process as it is like many others (super-hot water, blue Dawn, vinegar, no don't agitate whatever you do...). I will show you my nifty set-up, though.  I was lucky to be able to get giant, used food-grade plastic containers online.  I use them both for washing and storing fleece.  After the initial soapy soak, I find the fleece (which is divided amongst several laundry bags) wants to float and fight its way out of the water, and I have to keep struggling to keep it submerged until pretty much the final rinse.  To solve this problem, I set a colander into the top of the big container, gently forcing the fleece down, and weight it with a bucket of water (which goes to clean-up or garden-watering afterwards).


colander pushes the fleece below water-level
bucket of water holds it there


That's 6.5 lb of raw fleece soaking away


I know, what's with the waist-high bathtub? The people who owned our house before us ran a dog-grooming business.  This tub is perfect for washing fleece and yarn and making felt -- any kind of big wet job your sink can be too small for -- although first-time visitors tend to be taken aback on seeing the heavy chainlinks embedded in the walls at either end . . . really, it's not that hard to get my kids to have a bath!  And don't worry; we do have a normal bathroom upstairs!
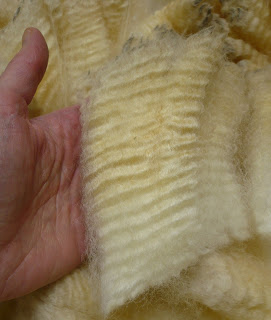

Raw, unwashed lock
pure white, washed lock of Corriedale


As you can see, the fleece cleaned beautifully and combed into the most marvellous top -- how could I resist using it immediately?!


Having washed another fleece and put the sunny, hot day to good use, it was time to get back to my blue batts.  To that end, I combed and carded some of each of my blues above, plus some more blue fleece I had, and added a few colours I couldn't resist.  


My crafting table, ready to start carding the batts - see my little white nest of Corriedale? 


This assortment includes Romney x Merino, Corriedale, Cotswold, Romney lamb, Cormo, Merino, Lincoln Longwool, Bluefaced Leicester x Corriedale, Bluefaced Leicester x Romney/Cotswold, Border Leicester x Bluefaced Leicester, Bluefaced Leicester cross (can't remember what it was crossed with...), representing sheep from Little Smoky BluesWooly Wool of the West,  Aye Sea EweMMF Wool, Aspen Grove Farm and Rupperts, mentioned above.


I carded them using the "sandwich" method as described here by Ashley Martineau of Neauveau Fiber Arts.  I like the way this method randomly blends parts of the colours and leaves other parts standing alone.

I had enough wool for four batts, which would make two skeins of wool on my wheel.  Two I wanted to use for a two-ply, teardrop-plied yarn, using the batts for one heavier ply, and some gorgeously lustrous BL/BFL for the other, which I would spin much thinner to create that nice teardrop ply.  Here they are, tempting me to spin them:
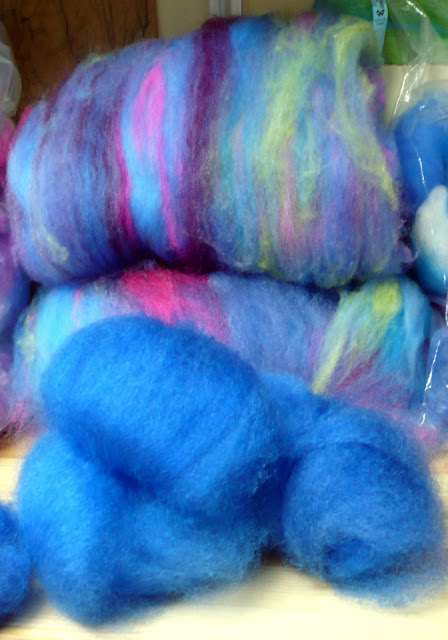

Resistance, as they say, is futile


Here's the single from the batt:


And the finished yarn:


A good 55 yards (51 m) long, and very bulky at 4 wpi. You can find it in my shop HERE
I decided to spin a supercoil yarn with the other two batts, because I was in the mood, and I wanted to see how the colours compared after plying.

First the long single from the batts:


You can see this is a lot thinner than the other one


Supercoiled yarn is spun by coiling a single like the one above around a core yarn.  Sometimes I use 8/4 cotton warp, but this time I used a wool-nylon mill-spun purple yarn.  Wool hangs and handles differently than cotton, of course, so using a different core will allow you to manipulate the finished yarn a bit differently.  I used wool for this skein because I felt like it (so often my reason for doing so many things...).

Here I am spinning it:


There's lots of extra twist in the singles so it holds together okay as a coil

I like to measure off the yarn I need for the core ahead of time, wind it into a butterfly, and let it hang down as I spin. I know a spindle full of yarn is going to spin me about 25-30 metres of supercoiled yarn, so I measure it off approximately and if I run out I can always tie on more.  With the butterfly dangling below, I can allow the extra twist that builds up in the core to unwind as I spin.  Every so often I stop and let the unspinning dangling core catch up with me.  


My dangling butterfly of inner core yarn, which I help untwist
with my left hand as I'm spinning, and
the kinky outer yarn angling in from the lazy Kate

I do this because I really don't like the way supercoil yarn cores overtwist when I spin them.  And even if I run the core yarn through the wheel in the opposite direction ahead of time to make up for the fact that I'm going to be adding twist to an already twisted yarn, it still overtwists, plus I'm now trying to manage two overtwisted yarns and the whole drama starts to drive me crazy.

Here's the finished yarn:


The colours came out more purplish than the other skein - it's about 36 yards/33 m long

And here it is in my SHOP
Well that was fun.  Now on to other colourways...

16 May 2013

Joys of Accidental Felting OR No Such Thing as a Ruined Fleece

Washing raw fleece isn't the most challenging aspect of spinning, but doing it right isn't always easy and in my case it took a fair bit of learning from a lot of sources.  (Thank you, all you fibre artists out there, for sharing your expertise, especially those who give free advice.) Now that I've washed many fleeces, I can safely say that while I'm better at it than I used to be, I still have a ways to go.  So many types of fleece, each with its own personality.  It's actually a process I really enjoy.  But that's another topic for another day.

Today the topic is a sad event in my fleece-washing history.  Luckily, the world being what it is, sometimes these little sadnesses that seem so heartbreaking in the moment can become happy accidents when seen in the right light.

One of the first whole raw fleeces I bought was from a beautiful Romney ewe from Aspen Grove Farm in Nova Scotia.  It was early in my spinning days.  I had made the natural progression of many spinners from buying dyed wool top to dyeing the top myself, and then on to processing wool from raw fleece.  Because while spinning commercial top offers the charm of ease and speed and a certain quality of texture unrecreatable at home, there's nothing like rolling your own, as they say.

Anyway, blah blah through the early stages of this raw fleece experiment and fast forward to getting home from Nova Scotia with my beautiful Romney fleece.  It was big.  I washed the whole thing at once and through the magic and mystery of the alchemy of wool, hot water, and soap, managed to pretty much felt the whole darn thing despite feeling sure I hadn't done anything wrong.  Bits here and there were okay for spinning, but most of it I couldn't work with.  Lesson learned, right.  I packed it away at the back of my workroom and tried not to think about it.  Onwards and upwards.

But its presence was impossible to ignore because my workroom is TINY and PACKED FULL with yarn and fleece and dye and a sewing machine and craft books and fabric and two looms and a spinning wheel and a drum carder and ... you know how it is.  So even packed away, it was never far and remained buzzing around in my mind, this lovely fleece just waiting there for the next stage of its life -- because it was still lustrous, curly, wonderfully long locks, they were just all stuck fast together at the cut ends.  I had to do something visible with it.  This fleece could not wind up as stuffing.  

Then one day an Etsy friend who was packing up to move sent me a box of felting roving in several colours.  Very kind.  And the blues and greens got me thinking of the ocean, deep waters and slowly grazing fish.  Now it so happens that -- coming from Nova Scotia (which is right on the ocean) and living in Ontario (which is a two-day drive away from Nova Scotia) -- the ocean  and subjects sea-related are on my mind much of the time.  I really miss living out there and I miss those things that you take for granted when the shore is only 20 minutes away.  So getting this shipment of roving with its water colours put in my head an idea for a big felting project of an underwater scene. Suddenly all that lovely Romney fleece calling out to me from its Rubbermaid prison was tangled seaweed waiting for a place to call home.


Jellyfish - total size 50" x 72"


I used every piece of bubble wrap I could find in the house for this, and found  a bamboo roll-up blind on sale just big enough to roll up the whole thing.  I did the wet felting on the floor of the laundry room, either kneeling on my gardening mat firming up the surface of the felt, or sitting on a chair, rolling the bundle with my feet.  When it was dry, I needle-felted the rest.


(top left)

I didn't spend much time planning the layout.  I began adding seaweed and just let myself go.  It was really, really fun.  I also got out all the bits of dyed fleece I had leftover from various yarns I've spun, and some bits that have come in fibre packs I've bought from Etsy, such as the Bitter Peacock and UpCycled Art.  


(top right)

I wanted the fleece to be what the piece was all about, so while I did add some fish -- because I love fish; I like the simplistic shape that suggests "fish" - they're not detailed in themselves except that they're made from pieces of handmade felt that I really like.


(bottom left)
I really like the 3-D effect of the curly Romney fleece as well.  I would go on to say that it's reminiscent of the floating, reaching fronds of seaweed in the Atlantic but it really isn't.  I would do a lot more snorkelling, otherwise.  In fact I find actual North Atlantic seaweed kind of scary and threatening and do my best to avoid it in the water.  Funny that I was inspired to felt an entire tapestry featuring it.  Maybe it's a sign that I've simply misunderstood it all these years and seaweed and I are heading for a future of mutual respect...

(bottom right)

Friendly jellyfish who wouldn't sting anybody
My favourite, though, is this guy.  He really became the focus of the piece, even though he's small relative to the overall size of the wallhanging.  The legs are some crazy alpaca boucle hand-dyed by the Fleece Artist that I had leftover from a scarf I wove years ago for my daughter.  I only had a bit of it left, but I couldn't part with it because the colours and texture are so lovely.  Again, as with the seaweed, I'm not a huge lover of jellyfish.  Not actual ones when they're swimming in the water with me, at least.  On TV documentaries they can be very beautiful.

I loved making this piece.  I was so happy to have all that lovely Romney fleece to dye whatever colours I felt like, and needle-felting it all together with wild abandon was very fulfilling.  I felt rich.

To hang it -- this is always the hard part for me, and I always forget just how hard until I find myself in the midst of trying to hang something again -- I first mounted the felt.  I made a backer with a piece of red upholstery fabric -- I'd been going for purple, actually, or bluish-purple -- something ocean-like -- but this red caught my eye and after much humming and hawing in the fabric store I went with it.  I like how it plays with the other colours in the tapestry.  I sewed a heavy cotton lining onto the back for strength, and invisibly sewed the felt directly onto this backer.  The top is folded over to make a long pocket for a hanging rod.  I used one of those metal wall brackets that are perforated with holes for hanging shelf brackets.  I cut and hemmed five openings along the pocket to expose holes in the rod, and voila -- after an endless afternoon of arguing with my husband about the best placement for the five hooks on the living room wall (these things can be hard on a relationship!) -- we got it hung and this baby's not coming down!


14 May 2013

Paper, Felting, and the Wish Fish

I've always liked the story of the Wish Fish.  It's the fairy tale of the poor fisherman who hasn't caught anything in days. Starving, he casts his net one last time and catches a beautiful fish that begs the fisherman to spare his life in exchange for a wish.  The fisherman's wish is that he and his wife not be poor anymore and he lets the fish go.  Arriving home, his shack has been transformed into a nice little cottage and he and his wife have enough to live comfortably.  

Stop.  That's as far as I like the story.  It continues on, perhaps predictably, with the wife saying her husband should have wished for more, and she keeps sending the poor fisherman (still poor, but in a new sense now) back to the sea to call the Wish Fish and up the wish.  In the end, the wife goes too far (she wants to be God) and as punishment for their individual shortcomings they both lose everything and go back to being poor.  Bla bla, it's always the wife who's super nasty in these fairy tales, isn't it?

But the initial bit, the event of coming across an unexpected opportunity in an unlikely place in a moment of great need -- the recognizing of a chance to change your direction and make things different or better or greater -- this I really like.  Because living life, we all come across these opportunities, but we never know where they may lie in wait.  To make it all more complicated, they're often hard to recognize and can require a great deal of courage to take advantage of.  This is what I like about the Wish Fish.  The wise voice saying, Yes, it's me.  Here I am.  Take a chance.

Sometimes I think about opportunities I should have grabbed when I had the chance.  But not too much.  I'm busy enjoying the ones I did grab.  Like spinning, for example, which I came upon at a time in my life when I was very stressed and needing a creative outlet that wasn't too taxing in certain ways, but allowed me to really express myself in others.

Another Wish Fish in my life was paper making, which I learned in Brazil some years ago (another story for another post).  But it began a relationship with handmade papers that I just can't get enough of -- the look, the texture, the weight.  At some point, I decided I wanted to come up with a paper project featuring a Wish Fish.

In an early exploration of this idea, when I was learning wet felting in a class a few years ago, I created this hanging -- not an image of the fairy tale, but someone waiting to find their way.


Wish Fish, wet felting, needle felting, beads, sewn onto paper-covered foam board, 22"x26"
My first attempt at making felt
I continued to let the idea simmer in my head for a few years, feeding it with some really nice handmade papers on Etsy from CotaProducts and  Bonfires.  My original idea had been to embroider the paper, but the red papers tore too easily, and when I layered them on backing paper, it was difficult to sew because of the glue.  The large sheets from CotaProducts are handmade in Africa from recycled cotton and would have been great for sewing, but they happened to be all background papers and not part of what I wanted to sew.  


I did some initial stitching on the tail with a bundle of four metallic threads, then changed direction and used paper cuttings for detail instead.  

The shell beads on the fish's face and in the water came in a fibre pack from TheBitterPeacock on Etsy.  All the papers used in the piece were handmade.


In the end, I decided to incorporate felting with the paper, and wet-felted a frame.  It's four long strips of felt that I needle-felted together and hid the seams with more roving. Most of the roving is from my own hand-dyed fleece, but there is some commercial roving I got from a friendly and generous customer. Then I needle-felted on commercial top to make the patterned edge.  The extra-thick handspun yarn around the edge of the picture was brought back to me from Brazil by my husband.


Wish Fish - total size with frame is 41" x 34"

The patterns for the needle-felted border are copied from Viking carvings.  I got some books on Viking art from the library and sketched out decorative patterns from wood and stone carvings found in archaeological sites.  I like the element of my family heritage that they add to the piece.  


It's hard to make out the moon.  I wrapped shiny silk yarn around batting mounted on a crescent of heavy paper, then glued it onto a cream-coloured circle.  The crescent stands about 1/2" high off the paper.  

12 May 2013

Experiment - Navajo Ply with inclusions, Plied Twice. Plus ME trying out blogging.

It's spring, so sheep are getting sheared and people like me who love new fleece are enjoying their Laughing Place.  I've been doing a fair bit of washing lately -- which I love to do, believe me, not just because of what's waiting when it's all done, but the whole process just feels good somehow -- but it's hard to resist taking a break to play.  And why resist, after all?  The dirty fleeces still waiting aren't going anywheres.

I was in the mood for BLUES, and now that my husband found me a second slow cooker sitting out on someone's curb the day after a neighbourhood yard sale (thank you everyone for not buying it), I can dye twice as much at a time. I like slow cooker dyeing because the fleece doesn't get disturbed in the dye bath and doesn't felt.  

There they are drying:
From top left clockwise: Romney x Merino, Cormo,
Border Leicester x BFL, BFL x Romney/Cotswold

From top left clockwise: Cormo, Lincoln Longwool,
Romney x BFL, Border Leicester x BFL
 Can't resist showing off the lock loveliness -- don't you just want to do something fabulous with all this gorgeous blue?

RomneyxBFL, Cormo, Lincoln Longwool, BFLxRomney/Cotswold, BLxBFL, RomneyxMerino, RomneyxMerino

I recently watched a few YouTube ads for an Ashford Country Spinner (my dream wheel) featuring Steph Gorin from Loop doing cool things (I love it when people share their ideas and give tutorials for free -- so generous with their talent!). In this particular video, she Navajo plies corespun yarn, inserting locks and various other items, then teardrop plies the whole thing.  

Sounds fun.  Seeing as my wheel is significantly smaller than a Country Spinner (I have an Ashford Traditional with a jumbo flyer) I thought I'd try something of what she did, but smaller.  Also, no non-wool insertions; I'm going to stick with locks.

I've been getting really into combing. It's so luxurious.  I even comb first when I'm going to card batts.  I just love the wool top when you pull it off.  The locks weren't all the same length, but close enough.  I don't think things necessarily have to be perfect in this department.  They carded beautifully and soon I was spinning my corespun.

Ready on my combs


After two passes with the combs:


                                                And pulled off in top:                        


I love love love the blues, and decided for a nice pow of colour to use some green locks to ply in -- these are all BFL-cross fleeces, except the far left, which is Cotswold.  


First catch the locks into the loops of your yarn as you Navajo-ply it ...


Then ply the whole shebang - this is plied on a bright blue mill-spun wool yarn with silver and purple metallic thread autowrapped.  It hasn't been washed yet in this pic, it's straight off the wheel.


A great weekend project, I think, very enjoyable accompaniment to the murder mysteries I usually listen to whilst spinning.  I'm not quite done -- either the skein or the mystery -- and it looks like this is going to fill my spindle twice over once it's all plied together.  But I like the yarn, very chunky and textured and I love the colours and what the locks do after the second ply.  Still thinking of blues, though.  I think I'll be delving into these fleeces again for my next skein.

(LATER)

Here's the yarn, washed and set - as you can see in the second photo, it's super bulky (2-3 wpi) and all told about 19 yards long.


You can see it in my shop here


In my Etsy shop